JetPack架构组件:ViewModel、LiveData、ViewBinding、DataBinding、LifeCycle、Room等的介绍、使用场景和使用方法。
LifeCycle
LifeCycle应用
使用ltifecycle解耦页面与组件
使用LifecycleService解耦Service与组件
使用ProcessLifecycleOwner监听应用程序生命周期
LifeCycle的好处
1.帮助开发者建立可感知生命周期的组件
2.组件在其内部管理自己的生命周期,从而降低模块耦合度
3.降低内存泄漏发生的可能性
4.Activity、Fragment、Service、Application均有LifeCycle支持(LifecycleObserver、LifecycleService、ProcessLifecycleOwner)
1
2
3
4
5
6
7
8
9
10
11
12
13
14
15
16
17
18
19
20
21
22
23
24
25
26
27
28
29
30
31
32
33
| 控件结合Lifecycle
public class MyChronometer extends Chronometer implements Lifecycle0bserver {
private long elapsedTime;
public MyChronometer (Context context, AttributeSet attrs) {
super ( context, attrs) ;
}
@OnLifecycleEvent (Lifecycle.Event.ONRESUME)
private void startMeter ( ) {
setpase (SystemClock.elapsedRealtime() - elapsedTime) ;
start ( );
}
@OnLifecycleEvent (Lifecycle.Event.ONSTOP)
private void stopMeter ( ) {
elapsedTime = SystemClock.elapsedRealtime() - getBase();
stop () ;
}
}
getLifecycle().addOnserver(chronomter)
public class MyLocationService extends LifecycleService {
public MyLocationService ( ) {
Log.d ( tag: "ning" , msg: "MyLocationService" ) ;
MyLocation0bserver observer = new MyLocationObserver ( context: this) ;
getLifecycle ( ) .addobserver (observer) ;
}
}
|
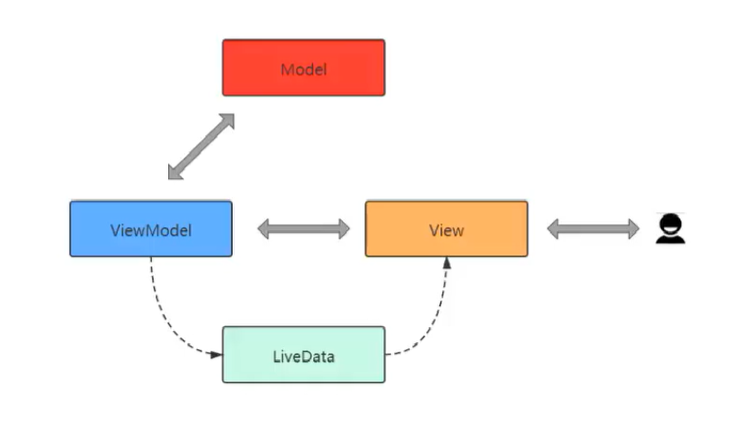
ViewModel
ViewModel的诞生
瞬态数据丢失
异步调用的内存泄漏
类膨胀提高维护难度和测试难度
ViewModel的作用
1.它是介于View(视图)和Model(数据模型)之间的桥梁
2.使视图和数据能够分离,也能保持通信
ViewModel的生命周期特性
独立于配置变化
1
2
3
4
5
6
7
8
|
MyViewModel extents ViewModel
int num = 0
viewModel = new ViewModelProvider(this,new ViewModelProvider(this,new AndroidViewModelFactory(this)).get(MViewModel.class))
++ viewModel.num
text.setText(viewModel.num)
|
AndroidViewModel
1.不要向ViewModel中传入Context,会导致内存泄漏
2.如果要使用Context,请使用AndroidViewModel中的Applications
LiveData
LiveData和ViewModel的关系
在ViewModel中的数据发生变化时通知页面
1
2
3
4
5
6
7
8
9
10
11
12
13
14
15
16
17
18
19
20
21
22
23
24
| public class MyviewModel extends viewModel {
private MutableLiveData<Integer> currentsecond;
public MutableLiveData<Integer> getCurrentSecond () {
if(currentSecond == null) {
currentsecond = new MutableLiveData<>();
currentsecond.setvalue (0) ;
}
return currentSecond;
}
}
viewModel.getCurrentSecond().postValue
viewModel.getCurrentSecond().observe(this,new Observerr<Interger>(){
@override
public void onChanged(Interger i){
textview.setText(String.valueOf(i));
}
});
|
LiveData的优势
确保界面符合数据状态
不会发生内存泄漏
不会因Activity停止而导致崩溃
不再需要手动处理生命周期
数据始终保持最新状态
适当的配置更改
共享资源
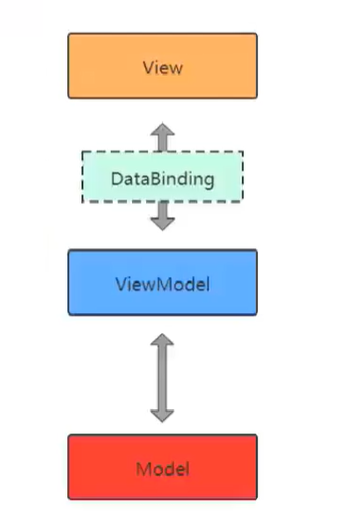
DataBinding
DataBinding的意义
让布局文件承担了部分原本属于页面的工作,使页面与布局耦合度进一步降低
1
2
3
4
5
6
7
8
9
10
11
12
13
14
15
16
17
18
19
20
21
|
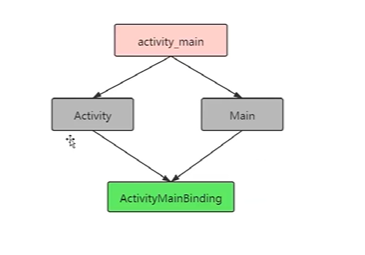
dataBinding = true
<Layout
<data>
<variable
name="idol"
type="com.dongnaoedu.databinding.Ido1"/>
</data>
ActivityMainBinding binding = DataBingingUtil.setcontentView(this,R.layout.activity_main);
Idol idol = new Idol("name",5);
binding.setIdol(idol);
android:text="@{idol.name}"
|
1
2
3
4
5
6
7
8
9
10
11
12
13
14
15
16
17
18
19
20
21
|
EventHandleListener{
private onclick(){
}
}
binding。setEventHandleListener(new EventHandleListener(this));
<data>
<variable
name="eventHandle"
type="com.dongnaoedu.databinding.EventHandleListener"/>
</data>
<Button
click="@{eventHandle.onclick}"
|
1
2
3
| 二级页面的绑定:<include>标签引用二级页面
app:idol = "@{idol}"
|
自定义BindingAdapter
加载网络图片
方法重载,加载本地图片
多参数重载
1
2
3
4
5
6
7
8
9
10
11
12
13
14
15
16
17
18
19
20
21
22
23
24
25
26
27
28
29
30
31
32
33
34
35
36
37
38
39
40
41
| 自定义binding
@BindingAdapter ( "image")
public. .static..void..set Image.(ImageView...imageView..tring..url){
if( !TextUtils.isEmpty (ur1)){
Picasso-get(0 Picasso
.load (url) RequestCreator
.placeholder (R.drawable.ic_launcher_background).into (imageview) ;
}else{
imageView.setBackgroundColor (color . GRAY) ;
}
)
<data>
<variable
name="networkImage"
type="String"/>
</data>
<Imageview
android: id="@+id/imageView""
app:image="@ {networkImage}
android: layout_width="300dip"
ActivityMainBinding binding = DataBingingUtil.setcontentView(this,R.layout.activity_main);DataBindingUtil.setContentactivityMainBinding.setNetworkImage ("https://gimg2.baidu.com/image_s");
@BindingAdapter (value = { "image","defaultImageResource" }, requireAll = false)
<Imageview
android: id="@+id/imageView""
app:image="@ {networkImage}
app:default="@ {localImage}
android: layout_width="300dip"
|
双向绑定
BaseObservable与ObservableField
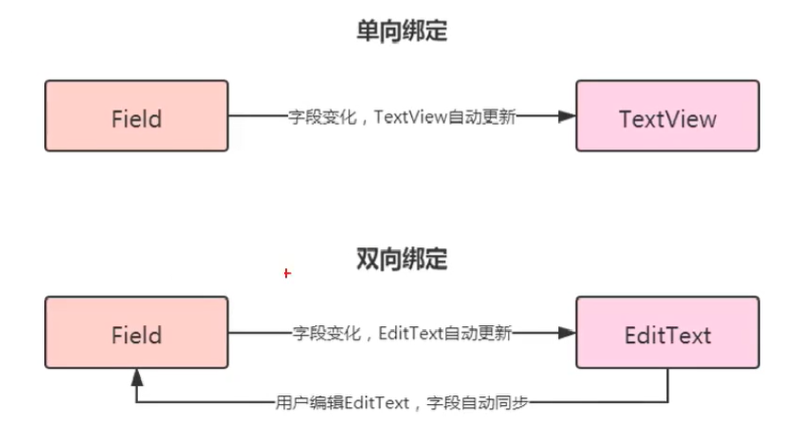
BaseObservable方式
1
2
3
4
5
6
7
8
9
10
11
12
13
14
15
16
17
18
19
20
21
22
23
24
25
26
27
28
29
30
31
32
33
34
35
36
37
38
39
40
41
42
43
44
45
46
47
|
public class User {
public string userName;
public User (String userName) {
this.userName = userName;
}
)
public class UserViewModel extends Base0bservable{
private User user;
public UserViewModel ( ) {
this.user = new User ( userName: "Jack" ) ;
}
@Bindable
public string getUserName ( ) {
return user.userName ;
}
public void setUserName ( String userName) {
if (userName != null && !userName. equals(user.userName) ) {
user. userName = userName;
Log.d( tag: "ning" , msg: "set username :"+userName);
notifyPropertyChanged(BR. userName) ;
}
}
<data>
<variable
name="userviewModel"
type="com.dongnaoedu.databinding4.UserviewModel" />
</ data>
<EditText
android: id-"e+id/editText"
android : layout_width="wrap_content"
android: layout height="wrap_content"
android : ems="10"
android: inputType="textPersonName"
android : text="@={userviewModel.userName)"
ContentactivityMainBinding.userviewModel (new UserViewModel());
|
ObservableField方式
1
2
3
4
5
6
7
8
9
10
11
12
13
14
15
16
17
18
19
| public class UserViewModel {
private ObservableField<User> userobservableField;
public UserViewModel ( ) {
User user = new User ( userName: "Jack " ) ;
userObservableField = new ObservableField<> ();
userObservableField.set (user);
}
public String getUserName ( ) {
return userObservableField.get ().userName;
}
public void setUserName (String userName) {
Log.d( tag: "ning" , msg: "userObservableField: "+userName) ;
userObservableField.get ().userName = userName ;
}
}
|
RecycleView
1
2
3
4
5
6
7
8
9
10
11
12
13
14
15
16
17
18
19
20
21
22
|
public MyViewHolder onCreateViewHolder (NonNull ViewGroup parent,int viewType) {
ItemBinding itemBinding = DataBindingUtil.inflate(LayoutInflater.from(parent.getContext (
R.layout.item,
parent,
attachToParent: false) ;
return new MyViewHolder (itemBinding) ;
}
@override
public void onBindViewHolder (@NonNull MyViewHolder holder,int position) {
Idol idol = idols.get (position) ;
holder.itemBinding.setIdol (idol) ;
}
ActivityMainBinding binding = DatabinfingUtil.setContentView(this,R.layout.activity_main);
binding.recycleView.setLayoutManager(new LinearLayputManager(this))
binding.recycleView.setAdapetr(new RecycleAdapter())
|
篮球计分:ViewModel + LiveData + Databinding
1
2
3
4
5
6
7
8
9
10
11
12
13
14
15
16
17
18
19
20
21
22
23
24
25
26
27
28
29
30
31
32
33
| public class MyViewModel extends viewModel {
private MutableLiveData<Integer> bTeamScore;
public MutableLiveData<Integer> getbTeamScore() {
if(bTeamScore -= nul1){
bTeamscore = new MutableLiveData<>();bTeanscore.setvalue (0) ;
}
return bTeamScore;
}
public void bTeamAdd (int i){
saveLastscore() ;
bTeamScore.setValue (bTeamScore.getValue ()+ i);
}
public void undo (){
aTeamscore.setValue (aLast);
bTeamScore.setValue(bLast) ;
}
}
android: onClick="@{ ()->viewModel.undo ()}" I
ActivityMainBinding activityMainBinding m DataBindingUtil.setContentView( activity. this,R.layout.acticity_main);
MyViewWodel viewModel = new ViewModelProvider ( owner. this,new ViewModelProvider.Android
activityMainBinding.setViewModel (viewModel) ;
activityMainBinding.setLifecycleowner(this);
|
DataBinding的优势
不再需要findViewByld,项目更加简洁,可读性更高。
布局文件可以包含简单的业务逻辑。
Room
1
2
3
4
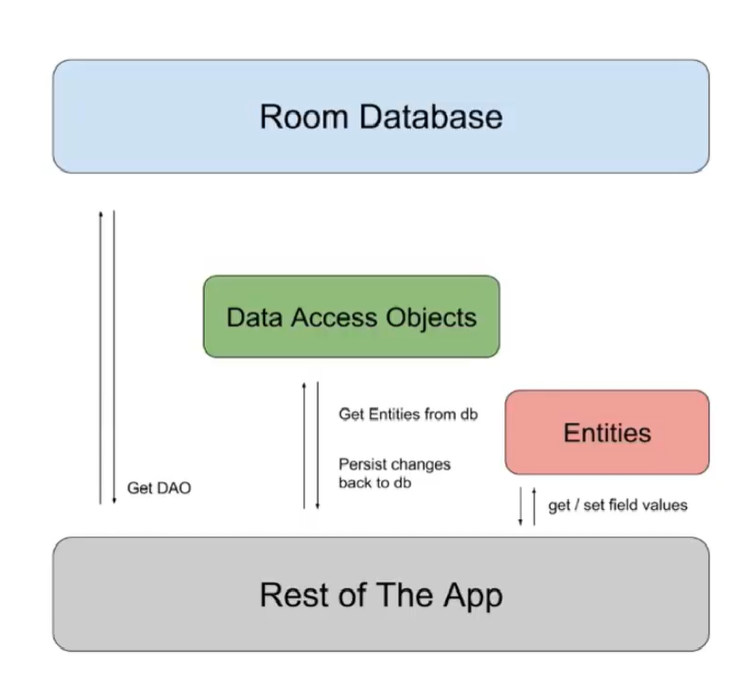
| Room重要概念:
Entity:实体类,对应的是数据库的一张表结构,使用注解@Entity标记>
Dao:包含访问一系列访问数据库的方法,使用注解@Dao标记。//Data Access Objects
Database:数据库持有者,作为与应用持久化相关数据的底层连接的主要接入点。使用注解@Database标记,另外需满足以下条件:定义的类必须是一个继承于RoomDatabase的抽象类,在注解中需要定义与数据库相关联的实体类列表。包含一个没有参数的抽象方法并且返回一个Dao对象。
|
app从Database得到get DAO,从DAO得到Entity,从Entity得到和设置对象值
1
2
3
| implementation 'androidx.room: room-runtime: 2.2.5'
//注解器:抽象类自动生成实现类
annotationProcessor 'androidx .room:room-compiler:2.2.5'
|
Entity
1
2
3
4
5
6
7
8
9
10
11
12
13
14
15
16
17
18
19
20
21
22
23
24
25
26
| @Entity (tableName - "student")
public class Student {
@PrimaryKey (autoGenerate = true)
@ColumnInfo(name = "id",typeAffinity = ColumnInfo.INTEGER)
public int id;
@ColumnInfo(name = "name", typeAffinity = ColumnInfo.TEXT)
public string name;
@columnInfo(name = "name",typeAffinity = ColumnInfo.TEXT)
public int age;
public student (int id,String name, int age){
this.id = id;
this.name = name;
this.age = age;
}
@Ignores
public student (string name, int age) {
this.name = name;
this.age = age;
}
|
Dao:增删查改接口类
1
2
3
4
5
6
7
8
9
10
11
12
13
14
15
16
17
18
| @Dao
public interface StudentDao {
@Insert
void insertStudent (student. .- students) ;
@Delete
void deletestudent (student. . . students);
@Update
void updateStudent (Student . . . students) ;
@Query ( "SELECT *FROMstudent")
List<Student> getAllstudent ();
@Query ("SELECT * FROM student WHERE id = :id")
List<Student> getStudentById(int id);
}
|
Database
1
2
3
4
5
6
7
8
9
10
11
12
13
14
15
16
| @Database (entities = {Student.class}, version = 1, exportSchema = false)
public abstract class MyDatabase extends RoomDatabase {
private static final string DATABASE_NAME= "my_db. db"
private static MyDatabase mInstance;
public static synchronized MyDatabase getInstance (Context context) {
if (mInstance == nul1) {
mInstance = Room. databaseBuilder(context.getApplicationContext(),
MyDatabase.class,
DATABASE_NAME').build() ;
}
return minstance;
}
public abstract StudentDao getStudentDao ();
}
|
使用
1
2
3
4
5
6
7
8
9
10
11
12
13
14
15
16
17
18
19
20
21
22
23
24
25
| MyDatabase database = MyDatabase.getInstance (this);
studentDao = database.getStudentDao ( ) ;
public void mlnsert (View view){
student s1 = new Student ( name: "Jack" , age: 20) ;
Student s2 = new Student( name: "Rose",age: 1 ;new
InsertStudentTask (studentDao).execute (s1);
}
class InsertStudentTask extends AsyncTask<Student, Void,void> {
private studentDao studentDao;
public InsertStudentTask (StudentDao studentDao){
this . studentDao - studentDao;
}
@override
protected Void doInBackground (Student. . . students) {
studentDao.insertStudent ( students) ;
rerurn null;
}
}
|
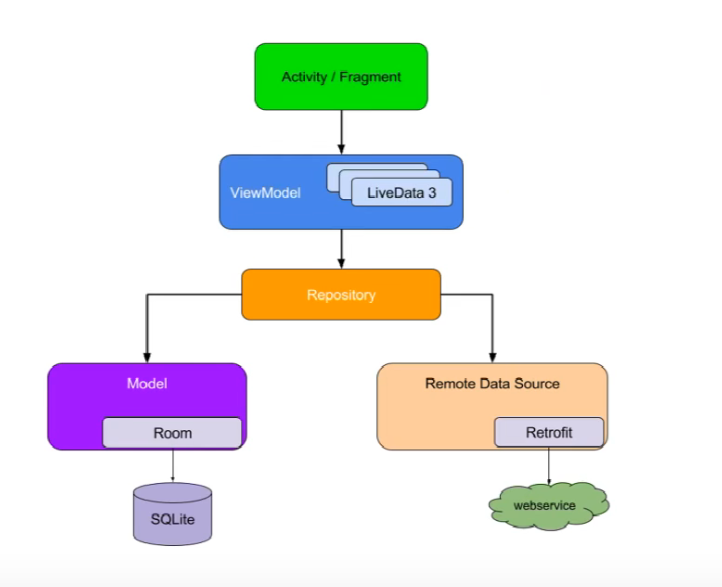
进一步优化
问题:每当数据库数据发生变化时,都需要开启一个工作线程去重新获取数据库中的数据。
解决:当数据发生变化时,通过LiveData通知View层,实现数据自动更新。
Room+ViewModel+LiveData
1
2
3
4
5
6
7
8
9
10
11
12
13
14
15
16
17
18
19
20
21
22
23
24
25
26
27
28
29
30
31
32
33
34
35
36
37
38
39
40
41
42
43
44
45
46
47
48
49
50
51
52
53
54
55
56
57
58
59
|
public class studentRepository {
private StudentDao studentDao;
public StudentRepository (Context context){
MyDatabase database = MyDatabase.getInstance ( context) ;
this.studentDao = database.getStudentDao ( ) ;
}
public void insertStudent (Student. . . students){
new InsertStudentTask(studentDao) .execute (students);
}
class InsertStudentTask extends AsyncTask<Student, Void,Void> {
private studentDao studentDao;
public InsertStudentTask(StudentDao studentDao) {
this.studentDa
@override
protected Void doInBackground (Student. . . students) {
studentDao.insertstudent (students) ;
return nul1;
}
}
}
public class studentViewModel extends AndroidViewModel {
private studentRepository repository ;
public StudentViewModel ( @NonNull Application application) {
super(application) ;
this.repository = new StudentRepository(application) ;
}
public void insertStudent (Student. . . students) {
repository.insertStudent(students) ;
}
}
studentViewModel = new ViewModelProvider ( owner: this, new
ViewModelProvider.AndroidviewModelFactory(getApplication()).get(StudentViewModel.class)
studentViewModel.getAllStudentsLive () .observe ( owner: this,new Observer<List<Student>>()
@override
public void onChanged (List<Student> students){
adapter.setstudents ( students ) ;
adapter.notifyDataSetChanged ( );
});
}
public void mInsert (View view) {
Student s1 = new student ( name: "Jack", age: 20) ;
Student s2 = new Student ( name: "Rose", age: 18);
studentviewModel .insertStudent (s1,s2) ;
}
|
room版本升级
1
2
3
4
5
6
7
8
9
10
11
12
13
14
15
16
17
18
19
20
21
| 1.构造Migration
static final Migration MIGRATION_1_2 = new Migration (1,2){
@override
public void migrate (@NonNull SupportSQLiteDatabase database){
database.execSQL ( "ALTERTABLE student ADD COLUMN sex INTEGER NOT NULLDEFAULT 1" );
};
2.添加addMigrations
public static synchronized MyDatabase getInstance (Context context){
if ( mInstance -= nul1){
mInstance = Room. databaseBuilder(context.getapplicationContext(),
MyDatabase.class,
DATABASE_NAME)
.addMigrations (MIGRATION_1_2,MIGRATION_2_3)
.build () ;
}
return mlnstance;
}
3.修改注解
@Database (entities = {Student.class}, version = 2, exportSchema = false)
|
使用Migration升级数据库
问题:如果用户设备上数据库版本为1,而当前要安装的App数据库版本为3,怎么办?
Room会先判断当前有没有直接从1到3的升级方案,如果有,就直接执行从1到3的升级方案,如果没有,那么Room会按照顺序先后执行Migration(1,2)、Migration(2,3)以完成升级。
Navigation
1
2
3
4
5
6
7
8
9
10
11
12
| Navigation的主要元素
1.Navigation Graph,一种新的XML资源文件,包含应用程序所有的页面以及页面间的关系。
2.NavHostFragment,一个特殊的Fragment,可以将它看作是其他Fragment的容器,Navigation Graph中的Fragment正是通过NavHostFragment进行展示的。
3.NavController,用于在代码中完成Navigation Graph中具体的页面切换工作。
他们三责之间的关系当你想切换Fragment时,使用NavController对象,告诉它你想要去Navigation Graph中的哪个Fragment,NavController会将你想去的Fragment展示NavHostFragment中。
创建顺序:
Fragment -> Navigation Graph -> main_layout:NavHostFragment -> ->
NavController navController = Navigation.findNavController( activity: this,R.id.fragment);
NavigationUI.setupActionBarWithNavController( activity: this, navController);
|
NavigationUl的作用
Fragment的切换,除了Fragment页面本身的切换,通常还伴有App bar的变化。为了方便统一管理,Navigation组件引入了NavigationUI类。
更多支持
App bar
ActionBar
Toolbar
CollapsingToolbarLayout
menu
抽屉菜单 (DrawLayout+Navigation View)
底部菜单((BottomNavigationView)
Jetpack+Kotlin+MVVM项目
采用 Jetpack +Kotlin 协程实现的 MVVM 架构项目:Eyepetizer)